Pages

I'm Back!

.

I just got into town after traveling across the country with my two toddlers! So, needless to say, I am whooped. But happy to be home. You'll probably notice that I made a few format changes to the blog, so please let me know if something is broken or just doesn't look right.

Also, while I was gone it looks like the folks at 25mm Warrior gave me a plug! Thanks a ton guys! Oh, and again thanks to Papa J.J. for letting me know.

In other gaming news, I heard that 40K Radio is closing their doors. While I am sad to see them leaving the air, I am happy to say that their Freebootaz Forums are going strong. I didn't always agree with what they had to say, and I thought they could do some things better- I never missed a show. So long guys, and thanks for all the fish (and horrible Tau puns).

The Dr. is Out

.

Sorry for any lack of updates the last week, but I've been out of town and surprisingly shirt on Internet access points. No fear, I only have a mild sunburn sitting on the beach and I did get one game in with my old gaming group.pictures will be posted as well as a full Bat Rep next week. Enjoy!

Lemon Russ Demolisher

.


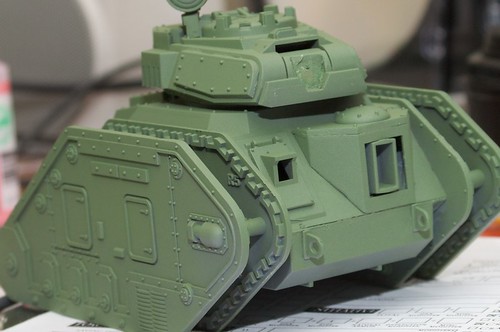
For May I stuck with Imperial Guard and chose a Heavy Slot- the Lemon Russ Demolisher! I also tried some new weathering techniques which I'll talk about below. Stage One: Prime with Army Builder: Army Green and touch up with a watered down Foundation Knarlock Green. I found these two colors match almost directly, with the Knarlock Green being a touch lighter shade.
Demolisher Stage 1

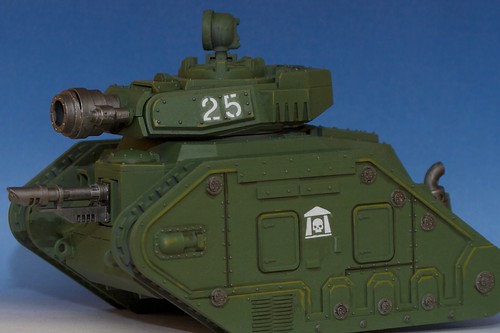
Stage Two: Highlight the edges with Camo Green; Boltgun Metal to the metal bits; Apply the Decals with MicroSet and MicroSol (must haves when using decals). Over the decals I touched up the letters with Skull White and tried to mute the decal effect with more Knarlock Green. I'm not to worried right now because we are only half way done... you won't see the sheen on the decals soon (I hope!).

Demolisher Stage 2

Stage 3: Now its time to weather the model. For my Imperial Guard, I choose a method that basically puts a 'filter' over the model using oil based paints, using a oil based pain for rust effects, then finally using a weathering powder at the end. You can read more about my decisions here.
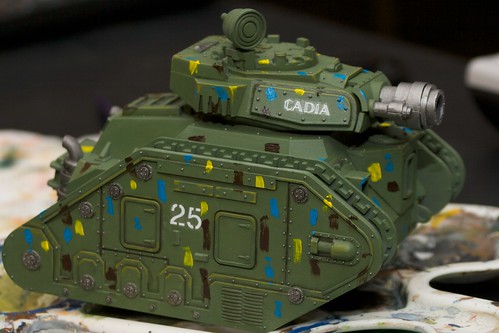
Lets get started. First off I took some Oil Based paints and painted thin vertical stripes of brown, blue, and yellow. Don't freak out on me, it'll change in one second!

Demolisher Stage 3A

Stage 3B: take some paint thinner in your brush and 'thin' the paint in downward vertical strokes. The thinner will desolve the oil paint, leaving you with a filter over the tank. You can play around with where you put the paint, and how much in order to make the tank's weathering seem less uniform.
Demolisher Stage 3B

Stage 4/5: After you paint the oil based paints, you have to seal them. On a regular canvas painting, it may take at least 24 hours for the paint to dry. However, on our plastic models, it will never fully dry and will rub off even with careful handling. So you must seal the model. After that, I did the same technique with Winton Oil Color #340 Raw Sienna. Now this curious color has 'Natural Iron Oxide' as its pigment. That's rust people! After sealing the bottled rust to the model, I placed the tracks (primed black) on the tank. I also added some paint peeling effects with Chaos Black on several edges of the tank in a random blotting motion, then filled in the middle with Boltgun Metal. Be sure to leave a bit of black around the silver. Remember to seal again after added the rust oil paint.

Demolisher Stage 5

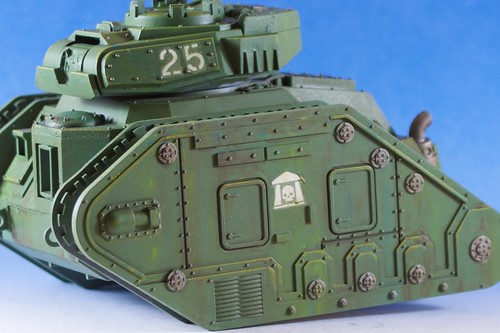
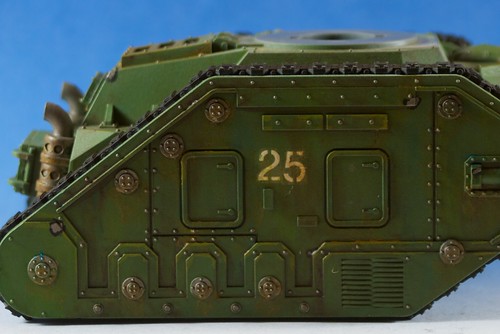
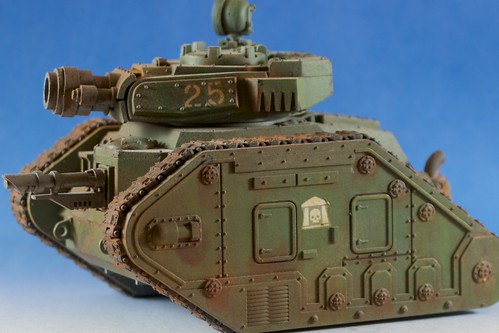
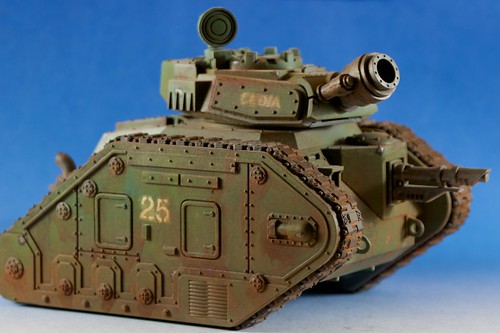
Final Stage: Even here, I am happy with the model. However more dirt, mud, and age needs to be added. I used the weathering pigments from Secretweaponminiatures and used there tutorial as well. You can read it here. Grabbing an old drybrush I dove into the project. Dark Earth first, then Terracotta Earth, then finally Clay Brown. Add your pigments in a random fashion and don't be afraid of really going to town. If you don't like what you have, you can always wipe it off! Lastly, I used the Metallic Iron on the edges of the tracks. Then it happened... I didn't use the sealant just right. You MUST stay at least 12" away from the model when sealing weathering pigments. If you get to close, you will 'soak' the pigments and they will get dark loosing a lot of color, and you will blast them off the model. Almost all of my pigments were gone! So second time with the pigments- this time I rubbed some of the pigment in more than the first time. And then when it came time to apply the sealant coat- I always stayed arms length away.

Demolisher Side

Demolisher Side

There you go- easy weathering that gives a great e effect with minimal effort, even if it takes a few days to complete because of the drying time of the thinner and sealants. This was my first time with the weathering pigments, next time I have a few ideas to make them stand out better!

Electron Boy: Coolest Hero EVER

.


Ok, this isn't 40K related. It isn't even miniature wargaming related. Its just cool.


So, deep inside, I have a soft spot- I also have kids and fear that everyday I'll get a call that something wrong is happ
ened to them. So this story brought a tear to my eye- imagining what that young man got to experience. Super cool.

Ok, enough of that, here are some of the cool parts of the storey. The young man has terminal liver cancer and the fine folks at Make a Wish gave him (and every kid) his wish- become a super hero for a day. Enter Electron Boy and his side kick, Lightening Lad! They do justice against the evil villain, Dr. Dark. Electron Boy travels in a Delorian (freaking awesome) all over Seattle- QWest field, the power company, and the Needle before finally arresting Dr. Dark. Read the story, its possibly the coolest thing I've ever read.

40K June Releases

.


I think we all were a bit surprised today when we got the email from GW about the 40K releases. Ok, just kidding. Every blog site out there has been like sharks circling the blood in the water guessing as to the release date of the new Eldar and Imperial Guard tanks as part of the Spearhead release.

In case you haven't (somehow) seen it, look here.

I like the Manticore, and plan to get at least one when it comes out. The potential to kit bash one together was very low, especially compared to how this one looks. The missile rack is a bit big compared the chimera it is attached to, but I can easily over look that since the missiles are so friggin' cool looking. The LR kit is pretty blah, plus I already have enough of them. So interest is low in that kit. One thing is still missing- the Hydra. I figure it will be out soon enough. Just in time for every hack player (like me!) to have a full army of Hydra's, Manticores, and Vendettas. Actually, it sounds like a good business model to me.

Lastly, the Eldar Night Fire Prism/Night Spinner kit has sold me to the ranks of the Space Elves. A couple of weeks ago, I received some Eldar in a trade. Lately I was thinking about trading them out for something else. However, this addition to the Eldar line up has me thinking differently. I mean, when else can you use a clear plastic weapon to blow crap up!?!

Kudos' to GW in the latest release. Now I have to save up my pennies!

Early May

.


That last week didn't see too much in the way of painting, but I did get some gaming in. Over the past few years, I have been playing an online/email global conquest game call Lords of the Earth. Sadly, most of the campiagns have gone silent. Fortunately, some members of the group have started a Pathfinders RPG play by email/message board game. We are all eager to get started- the past week has been full of creating characters, planning with other players, etc. In short, it was a great gaming week even though little actually gaming took place. My character? Muckles O'Barley- Halfling Sorcerer. It should be fun!

On the painting front, the Witch Hunters got another member of the party. This time an actual Witch Hunter! This model was one of the free models from Adpeticon. What a great model to get for free, and it was an instant addition to my warband.


Last night I started working on some Imperial Guard Tanks! It is heavy support month! I'll get some pictures posted soon. Also, I got some weathering kits from Secret Weapon Miniatures. They should be here soon, and I can't wait to use them.


Plague Marines: Tutorial

.

I just posted a tutorial on the Bolter and Chainsword forums on painting a Death Guard model using primarily washes. Check it out here.

I'll skip the boring middle parts and go straight to the finished product. You can thank me later!
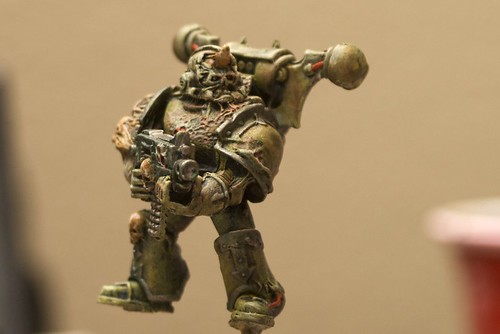
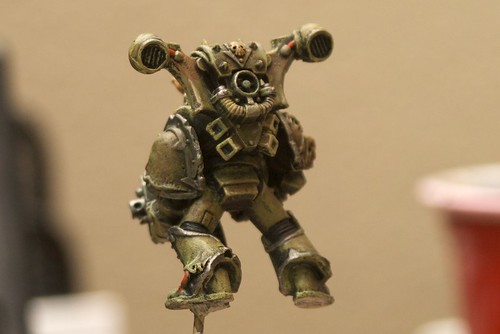

IMG_7555

IMG_7554

Painting this model was more fun that I thought it would be. Its going to be hard to concentrate on finishing those weak fleshed Imperial Guard so that I can start on some real models, like the Plague Marines!

True Line of Site

.


My friend (and first follower!) over at DiceRolla has a great acrticle on True Line of Site in Warhammer 40K.
Link.

There are several good points in the post, but ultimately its a shame that a game of "fun" often comes down to things like this. On the other hand, its a good reminder to discuss with your opponent before the game starts if you have any models that might even come close to causing a problem. And play with cool people. During a tournament- you are on your own. :)